Automate Kubernetes deployments with GitHub Actions
Published on
- Kubernetes
- GitHub Actions
 By Nic Wortel
Learn how you can use GitHub Actions to automatically build, test and deploy your Docker images to Kubernetes when you push a commit to your repository.
In this guide
- Push vs. Pull-based deployments
- About GitHub Actions
- Creating a new GitHub Actions workflow
- Running automated tests
- Building and pushing the Docker image
- Deploying the new image to Kubernetes
- Final workflow
Push vs. Pull-based deployments
Before we dive into the details of automating deployments to Kubernetes with GitHub Actions, let's take a step back and look at the two main approaches for automated deployments to Kubernetes: push-based and pull-based deployments.
With a push-based deployment, the CI/CD system is triggered by a commit to the repository, builds the Docker image, pushes it to a container registry, and then notifies Kubernetes to update the image and replace the pods.
With a pull-based deployment, an agent (such as ArgoCD) is running inside the Kubernetes cluster and continuously checks your Git repository and/or container registry for any changes. When it detects a mismatch between your configuration and the actual state of the cluster, it will automatically make the necessary changes to bring the cluster back into the desired state.
Pull-based deployments have the advantage that your cluster will always be in sync with the desired (configured) state and the additional security benefit that you don't need to give an external CI/CD system access to your cluster. On the other hand, push-based deployments are more flexible and easier to set up. In this guide we will focus on push-based deployments using GitHub Actions.
About GitHub Actions
GitHub Actions is a powerful tool for automating workflows in your GitHub repositories. It allows you to configure complex workflows which are triggered by events, for example when an issue is created, a pull request is merged or a commit is pushed to a branch.
The advantages of using GitHub Actions instead of a third-party CI/CD platform are the tight integration with GitHub, the ability to define workflows through configuration files stored in your Git repository, and the marketplace with open-source actions which can be used to build complex workflows without writing verbose shell scripts. In this guide we will use popular actions such as docker/build-push-action and azure/k8s-deploy to build and push a Docker image and apply our Kubernetes manifests to the cluster.
Security considerations
Because anyone can publish an action to the GitHub Marketplace, and because actions can execute arbitrary code and access the secrets you pass to them, it is important to consider the security implications of using third-party actions in your workflows. Using malicious actions can lead to supply chain attacks or the stealing of tokens and other secrets.
In this guide we will use popular actions published by verified and trusted organizations such as GitHub, Docker and Microsoft Azure. These verified publishers are indicated by a checkmark in the GitHub Marketplace. If you use other actions from the GitHub Marketplace, make sure to review the source code of the action and evaluate the trustworthiness of their publisher before using them in your workflows.
Creating a new GitHub Actions workflow
GitHub Actions workflows are defined in YAML files which are stored in a .github/workflows directory inside your Git
repository.
The benefit of this approach is that the workflow definition is versioned along with your code, so it can be reviewed,
discussed, and modified together like any other code.
The filename can be anything you like, as long as it ends with .yaml or .yml.
A repository can contain multiple workflow files, each defining a different workflow which can be triggered by different
events.
Each file should at least specify the name of the workflow and the event that triggers it:
name: CI/CD

on: push

jobs:
  (...)
In the example above, the workflow is named CI/CD and is triggered when a commit is pushed to any branch.
Running automated tests
Before deploying any changes to Kubernetes you'll want to run your automated tests to ensure that your application works as expected and that existing functionality doesn't break.
The exact steps to run your tests depend on the language and tools you are using, but you will typically need to follow these steps:
- Start a database container or other services that are required to run your tests.
- Install the correct version of the compiler or interpreter for your programming language, along with any required libraries, extensions or tools.
- Check out the source code of your application.
- Install the dependencies of your application using a package manager.
- Run the tests and any other quality checks.
The GitHub Marketplace provides a wide range of actions that can be used to perform these steps. For example, a workflow that tests a PHP application might look like this:
name: CI/CD

on: push

jobs:
  test:
    name: Test
    runs-on: ubuntu-latest
    services:
      database:
        image: postgres:17.4
        env:
          POSTGRES_PASSWORD: example
        ports:
          - 5432:5432
    steps:
      - name: Setup PHP
        uses: shivammathur/setup-php@v2
        with:
          php-version: '8.3'

      - name: Checkout source code
        uses: actions/checkout@v4

      - name: Install dependencies with Composer
        uses: ramsey/composer-install@v3

      - name: Run the tests
        run: vendor/bin/phpunit
This workflow defines a single job named Test which runs on an Ubuntu runner.
It starts a database container and then executes the following steps in sequence:
- It installs PHP 8.3 using the shivammathur/setup-php action;
- It checks out the source code of the repository using the actions/checkout action;
- It installs the dependencies of the application using Composer with the ramsey/composer-install action;
- It runs the PHPUnit test suite by executing
vendor/bin/phpunit.
If any of the steps fail, the job will be marked as failed and the workflow will be stopped.
Building and pushing the Docker image
When the tests have passed, we can start building the Docker image based on our Dockerfile. We will use the docker/login-action, docker/build-push-action and the with the docker/setup-buildx-action to authenticate with the container registry, build the image, and push it to the registry.
The docker/build-push-action allows us to build and push the image in a single step. It takes a list of tags as input, which can be static or dynamic values. This allows us to tag the image with a unique identifier, for example the Git commit hash, which we will later use to deploy the image to Kubernetes:
name: CI/CD

on: push

jobs:
  test:
    (...)

  build:
    name: Build
    runs-on: ubuntu-latest
    steps:
      - name: Set up Docker Buildx
        uses: docker/setup-buildx-action@v3

      - name: Login to GitHub Container Registry
        uses: docker/login-action@v3
        with:
          (...)

      - name: Build and push the Docker image
        uses: docker/build-push-action@v6
        with:
          tags: |
            ghcr.io/username/package:latest
            ghcr.io/username/package:${{ github.sha }}
Note that by default, docker/build-push-action uses the Git context
so we don't need to use the actions/checkout action in this job.
Pushing to GitHub Container Registry
Using the GitHub Container Registry (GHCR) simplifies the authentication process because GitHub Actions automatically generates a token that can be used to push and pull images. The scope of this token is limited to the repository the workflow is running in.
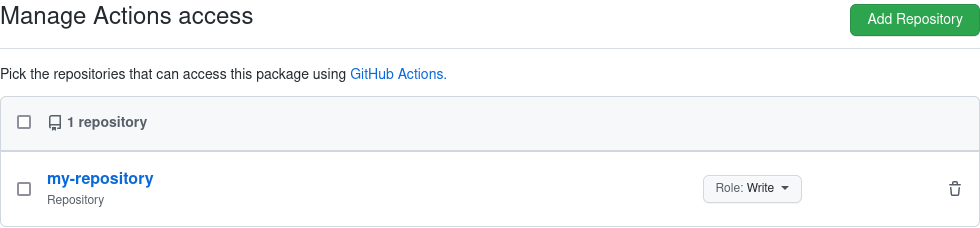
Repositories do not automatically have access to containers in the package registry. To grant a repository access to a package, you first have to create the package (by manually pushing an image from the command line), then go to the package settings and under Manage Actions access add the repository with the Write role:
After this, you can use ${{ secrets.GITHUB_TOKEN }} in the workflow:
      - name: Login to GitHub Container Registry
        uses: docker/login-action@v3
        with:
          registry: ghcr.io
          username: ${{ github.repository_owner }}
          password: ${{ secrets.GITHUB_TOKEN }}

      - name: Build and push the Docker image
        uses: docker/build-push-action@v6
        with:
          push: true
          tags: |
            ghcr.io/username/package:latest
            ghcr.io/username/package:${{ github.sha }}
Pushing to another container registry
If you are using a different container registry, you will have to adjust the registry input of the docker/login-action
and use different tag prefixes in the docker/build-push-action.
Additionally, you will have to create a GitHub Actions secret containing the credentials for the container registry.
For example, to push the image to Docker Hub, you would use the following configuration (in case of Docker Hub we can
omit the registry input of the docker/login-action because Docker Hub is the default registry):
      - name: Login to Docker Hub
        uses: docker/login-action@v3
        with:
          username: ${{ secrets.DOCKER_HUB_USERNAME }}
          password: ${{ secrets.DOCKER_HUB_PASSWORD }}

      - name: Build and push the Docker image
        uses: docker/build-push-action@v6
        with:
          push: true
          tags: |
            username/package:latest
            username/package:${{ github.sha }}
For registries that support personal access tokens (such as Docker Hub), you should create a token with push access to the registry and use that instead of your password.
Caching image layers to speed up the build
Building Docker images can take a long time, especially if you have to install dependencies or compile your application. When building images locally on your machine, Docker caches the results of each step so that subsequent builds are faster. But in a CI/CD environment such as GitHub Actions every build is executed in a fresh environment, so the cache is lost between builds.
To benefit from the Docker build cache in GitHub Actions jobs, the docker/build-push-action allows you to
configure how it should import and export its build cache.
There are different cache options available, such as pushing the cache to the container registry, storing it in a local
directory, or using the GitHub Actions cache.
Especially when using multi-stage builds, the GitHub cache backend can significantly improve the cache results as it allows you to cache the intermediate images between stages instead of just the final image.
To enable the GitHub cache exporter, configure cache-from and cache-to (with mode=max) in the build step:
      - name: Build and push the Docker image
        uses: docker/build-push-action@v6
        with:
          push: true
          tags: |
            ghcr.io/username/package:latest
            ghcr.io/username/package:${{ github.sha }}
          cache-from: type=gha
          cache-to: type=gha,mode=max
Enabling caching can reduce the build time of your Docker images from several minutes to just a few seconds.
Deploying the new image to Kubernetes
Now that we have built a Docker image and pushed it to our container registry, we can deploy it to Kubernetes. But before we can actually deploy our new image, we'll need to give GitHub Actions access to the Kubernetes cluster and give the cluster access to the container registry.
Creating the image pull secret
In order to pull private images from the container registry Kubernetes needs credentials to authenticate with it,
similar to how you need to run docker login on your local machine before you can push and pull private images.
These credentials have to be stored as an image pull secret in Kubernetes which can be referred to by the pod template
via the imagePullSecrets field.
If you have already set up the image pull secret in your application's namespace or if the image is public, you can skip
this step.
Assuming you are using GitHub Container Registry, you'll have to create a personal access token to authenticate with the
registry.
In your GitHub account settings, generate a classic personal access token with the read:packages
scope.
This token will be linked to your personal account.
It is recommended to give the token an expiry date to limit its lifetime.
Note, however, that you will have to regenerate the token and update the secret in Kubernetes when it expires.
Click on the "Generate token" button to generate the token.
Next we'll create the Kubernetes secret containing the token.
Run the following command to create a secret named github-container-registry, replacing <namespace> with the
namespace of your Deployment object, <github-username> with your GitHub username, and <token> with the generated
personal access token:
kubectl create secret docker-registry github-container-registry \
  --namespace=<namespace> \
  --docker-server=ghcr.io \
  --docker-username=<github-username> \
  --docker-password=<token>
After successful creation of the secret, you can refer to it in the imagePullSecrets field of your Pod template:
spec:
  template:
    spec:
      containers:
        - name: container-name
          image: ghcr.io/username/package:latest
      imagePullSecrets:
        - name: github-container-registry
Creating a ServiceAccount for GitHub Actions
Now that Kubernetes can pull the image from the container registry, we still need to give GitHub Actions access to the
Kubernetes cluster so it can apply the manifest files.
We'll create a ServiceAccount named github-actions:
kubectl create serviceaccount github-actions
Granting permissions to the ServiceAccount
By default, service accounts are not allowed to manage objects in the cluster. We need to create a Role or ClusterRole which grants the service account the necessary permissions to manage the resources required for the deployment. A Role is limited to a specific namespace, while a ClusterRole gives access to the entire cluster.
Applying the principle of least privilege, we'll create a Role
which grants the service account only the permissions it needs to manage a limited set of resources in a single namespace.
Create a file role.yaml with the following contents:
apiVersion: rbac.authorization.k8s.io/v1
kind: Role
metadata:
  namespace: default
  name: continuous-deployment
rules:
  - apiGroups:
      - ''
      - apps
      - networking.k8s.io
    resources:
      - deployments
      - replicasets
    verbs:
      - create
      - delete
      - deletecollection
      - get
      - list
      - patch
      - update
      - watch
This describes a Role in the default namespace named continuous-deployment with permissions to manage deployments.
If you have more manifests in your repository which you want to apply automatically, you should update apiGroups and
resources with the necessary values.
Run the following command to apply the Role to the cluster:
kubectl apply -f role.yaml
Now, in order to bind the Role to the service account, we need to create a RoleBinding:
kubectl create rolebinding continuous-deployment \
    --role=continuous-deployment \
    --serviceaccount=default:github-actions
Store the service account token in a GitHub Actions secret
When we created the service account, a token was automatically generated for it and stored in a secret. To find the name of the secret, we need to inspect the service account:
kubectl get serviceaccounts github-actions -o yaml
This will output the YAML representation of the service account, containing the name of the associated secret:
apiVersion: v1
kind: ServiceAccount
metadata:
  (...)
secrets:
- name: <token-secret-name>
Knowing the name of the secret, we can retrieve the YAML representation of the secret:
kubectl get secret <token-secret-name> -o yaml
Create a new GitHub Actions secret in your repository named KUBERNETES_SECRET, and use the full YAML output of the
previous kubectl get secret command as the value.
Now we can use the azure/k8s-set-context action in our
workflow to set the Kubernetes cluster context based on the cluster's API server URL and the service account secret:
jobs:
  test: (...)

  build: (...)

  deploy:
    name: Deploy
    needs: [ test, build ]
    runs-on: ubuntu-latest
    steps:
      - name: Set the Kubernetes context
        uses: azure/k8s-set-context@v4
        with:
          method: service-account
          k8s-url: <server-url>
          k8s-secret: ${{ secrets.KUBERNETES_SECRET }}
Replace <server-url> with the URL of the cluster's API server, which can be found using the following command:
kubectl config view --minify -o 'jsonpath={.clusters[0].cluster.server}'
Applying the manifest files
Now that all prerequisites are met, we can actually deploy our new image to the cluster. We'll use the azure/k8s-deploy action to apply the manifest files. This action takes a list of image tags as input and substitutes references to those images in the manifest files with the specified tags before applying the manifests to the cluster. This way we can replace the default image tag in the Deployment manifest with the tag of the image we just pushed to the container registry, without having to modify the manifest file every time we want to deploy a new version.
      - name: Deploy to the Kubernetes cluster
        uses: azure/k8s-deploy@v5
        with:
          namespace: default
          manifests: |
            kubernetes/deployment.yaml
          images: |
            ghcr.io/username/package:${{ github.sha }}
Don't forget that our workflow gets triggered when pushing commits to any branch of the repository.
To ensure that only commits to the main branch trigger the deployment, we can add a condition to the deploy job:
jobs:
  (...)

  deploy:
    name: Deploy
    if: github.ref == 'refs/heads/main'
    needs: [ test, build ]
    runs-on: ubuntu-latest
If your main branch is named differently, replace main with the name of your main branch.
Final workflow
Putting it all together, our final GitHub Actions workflow looks something like this:
name: CI/CD

on: push

jobs:
  test:
    name: Test
    runs-on: ubuntu-latest
    steps:
      # Steps to run automated tests for your application

  build:
    name: Build
    runs-on: ubuntu-latest
    steps:
      - name: Set up Docker Buildx
        uses: docker/setup-buildx-action@v3

      - name: Login to GitHub Container Registry
        uses: docker/login-action@v3
        with:
          registry: ghcr.io
          username: ${{ github.repository_owner }}
          password: ${{ secrets.GITHUB_TOKEN }}

      - name: Build and push the Docker image
        uses: docker/build-push-action@v6
        with:
          push: true
          tags: |
            ghcr.io/username/package:latest
            ghcr.io/username/package:${{ github.sha }}
          cache-from: type=gha
          cache-to: type=gha,mode=max

  deploy:
    name: Deploy
    if: github.ref == 'refs/heads/master'
    needs: [ test, build ]
    runs-on: ubuntu-latest
    steps:
      - name: Set the Kubernetes context
        uses: azure/k8s-set-context@v4
        with:
          method: service-account
          k8s-url: <server-url>
          k8s-secret: ${{ secrets.KUBERNETES_SECRET }}

      - name: Checkout source code
        uses: actions/checkout@v4

      - name: Deploy to the Kubernetes cluster
        uses: azure/k8s-deploy@v5
        with:
          namespace: default
          manifests: |
            kubernetes/deployment.yaml
          images: |
            ghcr.io/username/package:${{ github.sha }}
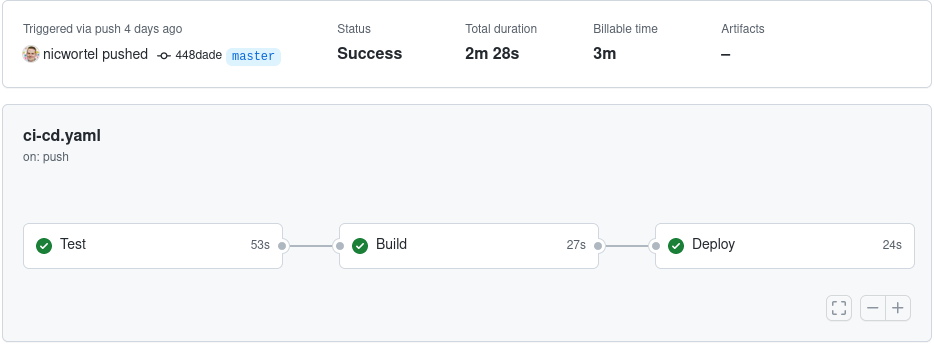
After committing this file and pushing it to the main branch, GitHub Actions will automatically start building and deploying your Docker image to Kubernetes.
If you want you can further expand this workflow, for example by sending Slack notifications on successful deployments, sending information about the new deployment to your application monitoring software, or even by spinning up an isolated environment for every pull request so you can review changes before merging a PR.

Are you looking to implement Kubernetes or GitHub Actions in your project or team? As a DevOps consultant I can save you time and money by guiding you through the process and helping you avoid costly mistakes.